
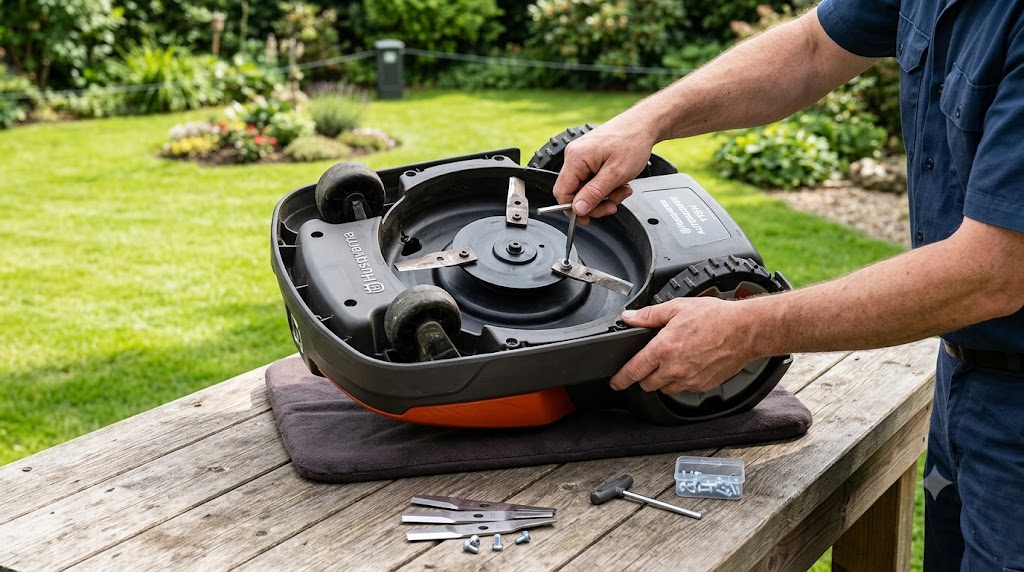
I used to think my Automower’s grass looked patchy because of a watering problem. I checked the sprinkler heads, adjusted the schedule, even had the soil tested. The actual cause was three small blades that had gone dull weeks earlier, quietly tearing grass tips instead of cutting them. Once I swapped them for a fresh set, the lawn recovered in about ten days.
Here’s the direct answer: the Automower 115H uses three small, double-edged pivoting blades sold in a 9-piece set (Husqvarna part number 577 86 46-03), secured by dedicated blade screws (part 590 50 87-01) that are different from the screws used on most other Automower models. Husqvarna recommends replacing the blades, and the screws with them, roughly every 4 to 8 weeks during the growing season, sooner if your lawn has sand, gravel, or a lot of obstacles.
This guide covers the exact blade and screw your 115H takes, how to tell they’re worn, the full swap procedure, why sharpening isn’t the answer here, and which replacement kits are worth buying.
What Size and Type of Blades Does the Automower 115H Use?
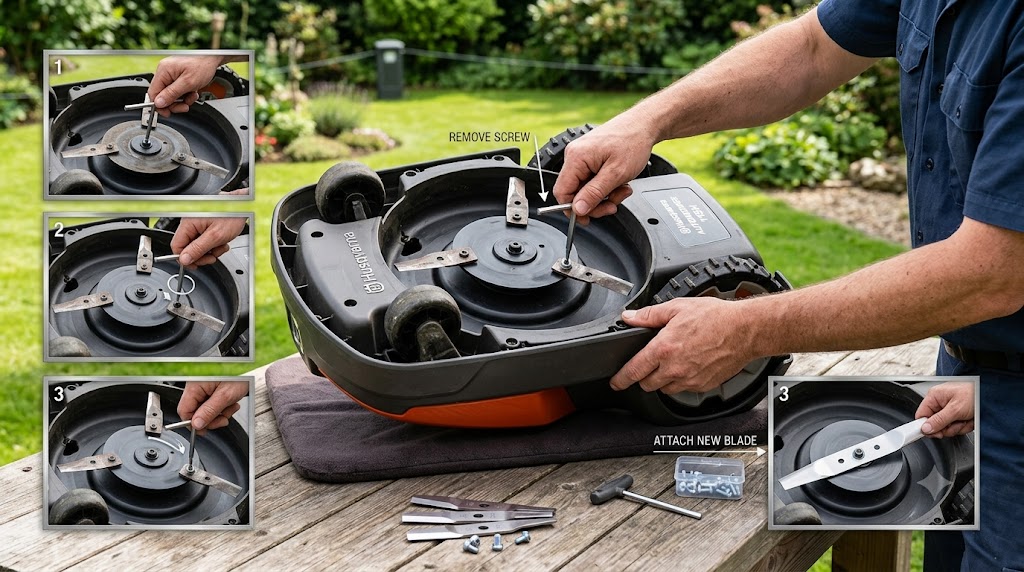
The 115H’s cutting disc holds three small, razor-like blades, not one long bar blade like a traditional mower. Each blade pivots freely on its mounting screw. That’s intentional: when a blade strikes something solid, like a stone, root, or toy, it swings out of the way instead of snapping or gouging the object, then swings back once it clears it.
Husqvarna’s parts documentation lists the genuine blade set for the 115H (2020 and newer) under part number 577 86 46-03, sold as a 9-piece blister pack, which covers three full blade changes. That same part number is shared across several other Automower models built on a similar cutting deck, including the 105, 310, 315, 315X, 420, 430X, and 450X, so a genuine 9-pack bought for a 115H will also work on those mowers.
The screw is where owners get tripped up. Husqvarna’s standard Automower blade screw, part 535 07 60-01, is explicitly listed as compatible with every Automower model except the 115H and the NERA series. The 115H instead uses its own dedicated cutting disc screw, part 590 50 87-01. If you order screws separately from blades, double-check you’re getting the 115H-specific part, not the general Automower screw.
How Often Should You Replace Automower 115H Blades?
Husqvarna’s own support guidance recommends replacing Automower blades roughly every 2 months for optimal mowing results and lower energy use, though the exact interval depends heavily on grass type and yard size. Husqvarna’s regional guidance breaks this down further by blade type: standard Long Life Safety Blades typically need replacing every 6 to 8 weeks, while the tougher Endurance Safety Blades can often stretch to 3 to 4 months.
Several factors push that timeline shorter. Sandy or gravelly soil erodes and dulls blades far faster than clean, well-established lawn. Fast spring grass growth means more cutting action per hour of mowing, which wears blades quicker during that season than in slower summer growth. Fertilizer residue and constant obstacle contact (fences, tree roots, garden edging) all add wear on top of normal use.
A useful rule of thumb some Automower technicians use: for a robotic mower cutting around 1,000 square meters regularly, blades tend to hold a usable edge for up to about 8 weeks before performance drops off. If your lawn is smaller than that or has fewer obstacles, you may get more life out of a set; if it’s larger or rougher, plan on changing sooner.
Signs Your Automower 115H Blades Need Changing
You don’t need to guess on a fixed calendar. Husqvarna’s own troubleshooting guidance points to two clear symptoms: frayed or whitened grass tips after a mowing cycle, and any visible wear, chips, or damage on the blades themselves when you inspect them directly.
Beyond that, watch for:
- The mower sounding noticeably louder or more strained than it used to during cutting
- Grass in parts of the lawn looking uneven, torn, or a slightly grey-brown color a day or two after mowing
- Visible rust, pitting, or a rounded (rather than sharp) edge on the blade when you hold it up to the light
- Vibration or wobble from the cutting disc, which can mean mismatched or unevenly worn blades rather than a motor problem
Running the mower on dull blades doesn’t just look bad. Husqvarna notes it can also strain the mower and increase energy use, since the blade motor works harder to force its way through grass instead of slicing it cleanly.
Automower 115H Blade Replacement: Step by Step
The swap itself takes most owners under ten minutes once the blades and screws are in hand. Husqvarna’s official procedure is the same for both the main cutting disc and, on models that have one, the EdgeCut disc.
- Put on cut-resistant gloves before touching the blades. This isn’t optional; the blades stay sharp enough to cut skin even when they’re too dull to cut grass well.
- Turn the mower off completely (for jog-wheel models, turn the wheel to Power off and confirm).
- Flip the mower over onto a stable, soft surface so it doesn’t scratch the housing or tip while you work.
- Unscrew each of the three old blades from the cutting disc using the correct screwdriver for the 115H’s blade screw.
- Remove all three old blades and screws together. Don’t leave any old screws in place.
- Fit the three new blades onto the disc’s mounting posts. They should sit loosely enough to pivot by hand; that’s correct, not a defect.
- Install new screws, not the old ones, and tighten each to snug. Reusing old screws is a common mistake, and Husqvarna specifically warns that worn screws can let blades come loose during operation.
- Confirm all three blades spin freely once installed, then set the mower back on its wheels.
A few rules matter as much as the steps themselves. Always use genuine Husqvarna blades and matching screws rather than mixing brands or types on the same disc, since Husqvarna warns that combining different blade types, or mixing new blades with old ones, can throw the cutting disc out of balance and cause noise or vibration. If your mower runs the Automower Connect app, reset the blade usage timer after every change so the app can track wear from a clean baseline going forward.
Can You Sharpen Automower 115H Blades?
Technically, yes, but it’s rarely worth the effort. Automower blades are small, thin, double-edged (and on Endurance HSS versions, four-edged) stamped pieces of steel, designed from the start to be cheap and disposable rather than resharpened repeatedly like a traditional mower’s steel bar blade. A 9-piece genuine set typically costs less than a single sharpening session would take in time and equipment.
Husqvarna’s broader position on its mower blades generally is that it does not recommend sharpening, since a new blade is precision made and balanced at the factory, and hand-sharpening risks throwing that balance off. For a bar blade on a walk-behind mower, an out-of-balance blade causes vibration. For an Automower’s small pivoting blades, an unevenly sharpened edge is more likely to just mean uneven wear and a worse cut, without the cost savings you’d get from sharpening a full-size blade.
If you do want to extend a set’s life slightly, some owners flip a double-edged blade around on its screw once one edge dulls, effectively getting a second edge out of the same piece of steel before replacing it outright. That’s a reasonable stopgap between scheduled changes, not a substitute for one.
Blade Screws: Why They Matter More Than People Think
It’s tempting to reuse the old screws when you swap blades, especially if they look fine. Husqvarna’s official guidance is direct on this: replace the screws every time you change the blades, because reused screws can loosen during operation and let a blade come free while the mower is running.
Crucial Warning: Reusing old screws is a safety hazard. Worn screws are prone to loosening or snapping under centrifugal force, which can release blades at high speed, risking damage to the cutting deck or injury. Always use the fresh screws that come with your new blade pack.
There’s a second reason to change screws on schedule rather than waiting: corrosion. If blades go too long between changes, the screws holding them can rust in place. When that happens, the screw head can strip when you try to remove it, sometimes forcing a full cutting disc replacement instead of a simple ten-minute blade swap. Changing blades and screws together on a regular schedule is cheaper insurance than dealing with a seized screw later.
Remember also that the 115H’s screw (590 50 87-01) is a different part number from the general Automower screw (535 07 60-01) used on most other models, so if you’re ordering screws on their own rather than as part of a full blade-and-screw kit, confirm the part number matches your 115H specifically.
Standard vs. Endurance Blades: Quick Comparison
| Long Life Safety Blades | Endurance Blades | |
|---|---|---|
| Typical replacement interval | Every 6 to 8 weeks | Every 3 to 4 months |
| Material | Carbon steel | Hardened steel, tougher cutting edge |
| Cutting edges per blade | 2 | Up to 4 |
| Best for | Clean lawns, standard mowing conditions | Lawns with more debris, roots, or obstacles |
| Cost per change | Lower per pack | Higher per pack, fewer packs needed per year |
Either type works in the 115H’s cutting disc. The right choice comes down to how rough your lawn conditions are and whether you’d rather change blades more often for less money each time, or less often for a bit more per set.
Robot Mower Blade Maintenance Schedule
A simple seasonal rhythm keeps this from becoming a mental chore:
- Every 2 to 4 weeks: Quick visual check. Flip the mower, look at the blades and cutting disc for buildup, rust, or obvious damage.
- Every 6 to 8 weeks in growing season: Full blade and screw replacement if using standard blades, or inspect closely if using Endurance blades.
- Every 3 to 4 months: Full replacement if using Endurance blades.
- Before winter storage: Change blades and screws regardless of when they were last replaced, clean the cutting disc thoroughly, and do a general wear inspection before putting the mower away for the season.
If you’re also due for a battery check during the same maintenance pass, our Automower 115H battery replacement guide walks through that swap in detail.
Best Replacement Blade Kits for the Automower 115H
595084411 Endurance Mower Blades, 6-Pack, for Husqvarna Automower (compatible with 115H): Stainless steel endurance-style blades with matching screws included, sized for the 115H’s cutting disc along with several other Automower models.
Terre Products 9-Pack Robotic Lawn Mower Replacement Blades: A higher-quantity, budget-friendly option covering a full three blade changes in one order. Confirm the listing’s exact fitment notes against your mower before ordering, since this pack is sold across several Automower and Gardena models.
Whichever kit you choose, buy blades and screws together rather than separately, since Husqvarna’s own guidance is to replace both at the same time.
Key Takeaways
The Automower 115H uses three small, double-edged pivoting blades sold as a genuine 9-piece set (part 577 86 46-03) with a dedicated screw (590 50 87-01) that’s different from the screw used on most other Automower models. Plan on replacing blades and screws together every 6 to 8 weeks with standard blades, or every 3 to 4 months with Endurance blades, and watch for frayed grass tips or visible blade wear as your cue to change sooner. Sharpening isn’t really worth the effort on these small stamped blades since a full genuine set costs little and installs in minutes. Always replace the screws along with the blades, and never mix old and new blades on the same disc.
If something about your mower’s cutting performance still doesn’t add up after a fresh blade change, Flavor Advisor’s team is happy to help you troubleshoot further.
Frequently Asked Questions
What size blades does the Husqvarna Automower 115H use?
How often should I change my Automower 115H blades?
Can I sharpen Automower blades instead of replacing them?
Does the Automower 115H use the same blade screws as other Automower models?
Why do Automower blades need to spin freely on their screws?
What happens if I don't replace the blade screws along with the blades?
How do I know if my Automower's blades are dull?
Can I mix old and new blades or different blade types on the same disc?
Do I need special tools to change Automower 115H blades?
How long does a set of Automower 115H blades typically last?
Sources
- Husqvarna Support, “How and when to change the blades on your Automower® robotic lawn mower”: https://us-support.husqvarna.com/en/automower/KA-01722
- Husqvarna US, “Automower® Support” (blade replacement interval, winter storage checklist): https://www.husqvarna.com/us/automower-support-center/
- Husqvarna NZ, “How Often Should My Automower® Run & When To Change The Blades?”: https://www.husqvarna.com/nz/learn-and-discover/how-often-should-my-automower-run-and-when-to-change-the-blades/
- Husqvarna Customer Support FAQ, “Can I sharpen the blade on my walk behind lawn mower?”: https://husqvarna.custhelp.com/app/answers/detail/a_id/336/~/maintenance---can-i-sharpen-the-blade-on-my-walk-behind-lawn-mower
- Husqvarna AUTOMOWER 115H Parts Manual (blade set and screw part numbers): https://www.manualowl.com/m/Husqvarna/AUTOMOWER-115H/Manual/614158
- Robotic Mower Supply, Automower Blade Screw part listing (535 07 60-01 exclusion note): https://roboticmowersupply.com/product/automower-blade-screw/