
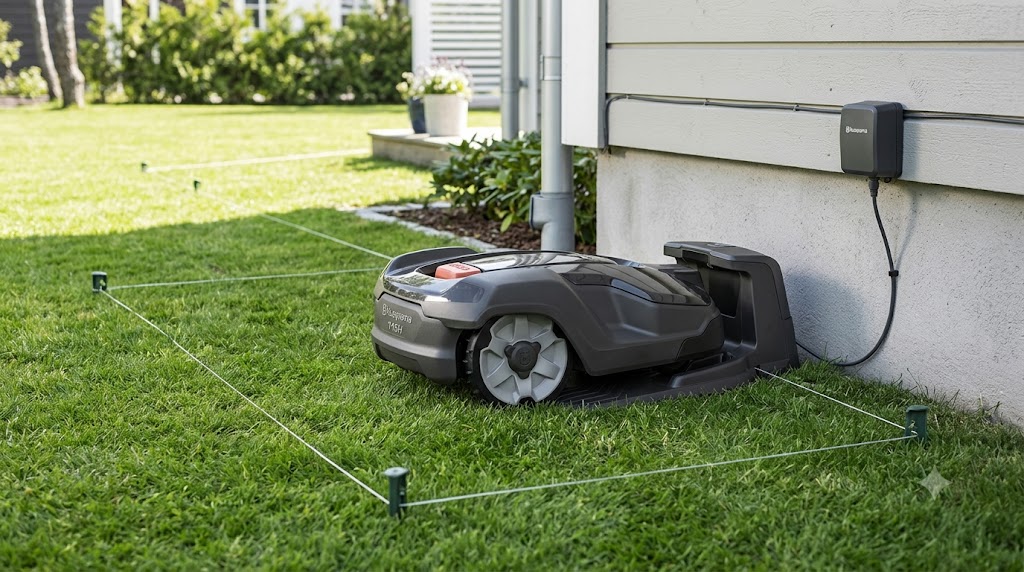
My neighbor spent two weekends chasing a flashing blue light on his Automower 115H charging station before he found out the problem wasn’t the wire at all. It was where he’d put the base. He’d tucked it under a tree for shade, right where the roots pushed the baseplate out of level by about an inch. That small tilt was enough to throw off the whole loop signal. He moved it three feet to a flat patch of grass, and the mower has docked itself every single time since.
That story sums up almost every 115H placement problem out there. People assume the charging station is forgiving, plug it in wherever looks convenient, and then spend hours troubleshooting a mower that was never actually broken.
The short answer: place the Automower 115H charging station on a flat, level surface (no more than about 2 cm of tilt), within reach of a standard power outlet, with at least 3 meters of clear space in front of it and 150 cm on each side. Keep it shaded if you can, keep metal objects away from the wires, and remember that the 115H depends entirely on its guide wire to find its way home, so that wire has to run clean and unbroken from the station into the mowing area.
Husqvarna makes and sells the Automower 115H, and this guide walks through every part of the setup based on the company’s own installation documentation, its official support pages, and real troubleshooting cases from owners and repair techs.
Why placement matters more on the 115H than newer models
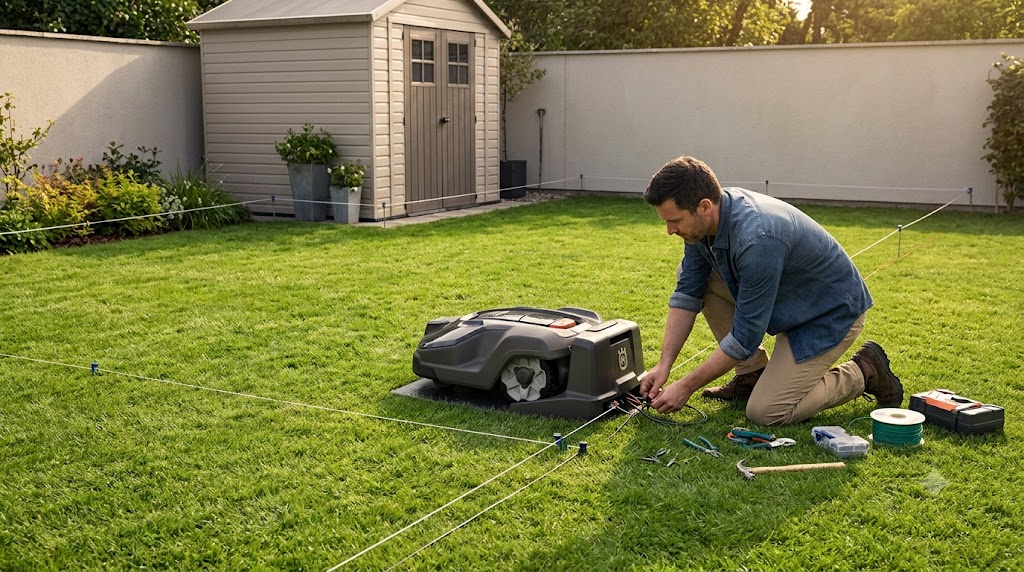
Here’s the thing that trips up a lot of first time owners. Newer Automower models use GPS style navigation (Husqvarna calls it EPOS) and don’t need a physical guide wire at all. The 115H is older technology. It runs on a boundary wire and a guide wire, and it leans on that guide wire completely to steer itself back to the dock. Most Automower charging stations don’t actually check whether the guide wire is intact, so you can have a break in it and still see a solid green light on the station. The 115H is different. It’s currently the only Automower model that can show a flashing yellow light, and that color exists specifically because the 115H depends completely on the guide wire to get home, unlike other models that can sometimes limp along even with a damaged one.
So on this particular mower, a sloppy guide wire installation doesn’t just cause minor hiccups. It’s the single biggest reason people end up with a mower parked in the middle of the lawn instead of tucked into its station.
Where to actually put the charging station
Husqvarna’s own placement guide lays out a short list of non negotiables, and they apply whether you’re running a straightforward boundary wire setup or something more complex. The charging station needs to sit near a power outlet, on a level surface, with a baseplate that isn’t bent.
Level ground isn’t a suggestion here. The manual specifies a maximum tilt of plus or minus 2 cm. That’s a small margin, and it’s why my neighbor’s tree root problem caused so much trouble. A slight lean changes how the mower’s wheels contact the charging plate, and misaligned contacts mean poor charging or the mower backing out and trying again and again.
For sun exposure, Husqvarna recommends positioning the station somewhere shaded, or using a purpose built Automower house if no shade is available. This isn’t about the mower overheating in the sun (it handles heat fine while mowing), it’s about protecting the plastic housing and electronics inside the station from long term UV and temperature swings.
For the mowing area itself, the ideal spot is central to your lawn, which cuts down on the travel time the mower spends driving to and from the station instead of actually cutting grass.
Clearance distances you can’t skip
This is where most DIY installs go wrong, because people eyeball the space instead of measuring it. For a physical boundary wire setup like the 115H uses, Husqvarna’s clearance requirements are specific:
Keep a minimum of 3 meters (10 feet) of free space in front of the charging station. Keep at least 150 cm (60 inches) of clearance to the left and right of the station’s center. Leave a minimum of 60 cm (2 feet) of open space behind it.
Skimp on the front clearance and the mower won’t have room to approach and align properly. Skimp on the sides and it can clip fences, walls, or planters on its way in. The rear clearance matters too, since the station needs airflow and the wires need somewhere to run without kinking against a wall.
One detail people miss: if you’re installing the station on a small island of grass, the boundary wire has to connect to that island directly, and you shouldn’t bolt the charging station down until every wire is installed and you’ve confirmed the whole system actually works. Screw it into the ground too early and you’ll be unscrewing it later when you realize the approach angle is wrong.
Guide wire and boundary wire connection specs
The 115H’s manual gets specific about wire distances, and getting these wrong is one of the most common causes of docking failures.
The boundary wire needs to sit a set distance from different obstacles, roughly 35 cm from some edges, 30 cm from others, and as little as 10 cm from certain features, depending on what the obstacle is. The guide wire itself needs a minimum of 30 cm of separation. These aren’t arbitrary numbers. Run the wires too close together and the signals interfere with each other, which is a huge cause of the “no loop” errors people search for.
Metal objects near the station and wires, things like rebar, metal landscape edging, or coiled low voltage cable, can also interfere with the signal, so keep those away from the install area entirely.
For the low voltage cable that runs from your outlet to the station, don’t leave it coiled up or tucked under the charging plate, since a coil causes interference with the signal coming from the station. Lay it flat, keep it clear of the blade path, and anchor it into the ground so it doesn’t get cut or shift over time. The 115H ships with a power cable, and depending on where you bought it, that cable runs somewhere around 16 feet to 5 meters. If your outlet is farther than that from your ideal spot, you’ll need an extension.
Power requirements
The station simply needs to be near a standard power outlet, and Wi-Fi range matters if your model updates its firmware over Wi-Fi, though the 115H connects primarily through Bluetooth rather than a cloud connection. That Bluetooth limitation is worth knowing going in. Reviewers who’ve owned the 115H point out that you can only control it from roughly 30 feet away, and it isn’t connected to the internet, so there’s no remote app control once you’re away from the house. That’s a fair tradeoff for a lower price point, but it means the outlet location should genuinely work for your daily routine, not just for the installer’s convenience.
What the charging station light is actually telling you
Once everything’s installed, the LED on the station becomes your main diagnostic tool. Here’s what each color means, based on Husqvarna’s own support documentation and detailed technician writeups:
| Light | What it means |
|---|---|
| Solid green | The boundary wire system is working correctly. |
| Flashing green | ECO mode is active and the loop signal is intentionally off while the mower charges, to save energy. It turns back on automatically for the next scheduled mow. |
| Flashing yellow | There’s a break somewhere in the guide wire. Since the 115H relies completely on this wire to find its way home, this is a 115H specific warning that most other models don’t show. |
| Solid blue | Too much wire is being used in the boundary loop, which weakens the signal. |
| Flashing blue | Low voltage from the power supply, a charging station board issue, or a problem somewhere in the boundary wire system. |
| Solid red | A possible hardware failure in the power supply unit or the station’s circuit board. |
| Flashing red | The antenna wire under the station’s baseplate is damaged, broken, or disconnected, and the mower can’t dock as a result. |
| Alternating colors | Usually points to a defective circuit board, sometimes triggered by a lightning strike or power surge nearby. |
Troubleshooting a charging station that won’t cooperate
If your light is off completely, start with the basics. Check whether the power supply unit, the low voltage cable, or the mains cable is damaged or improperly connected, and check whether there’s been a power outage or a tripped residual current device.
If it’s flashing blue, don’t assume the worst right away. Check that the boundary wire is properly connected at the station, with the wire ends fully inserted and the contacts clean. If that checks out, you can test the wire itself with a multimeter by disconnecting it and measuring resistance across the two ends. A healthy loop typically reads around 0.8 ohms per 100 meters of wire, so a 200 meter installation should land around 1.6 ohms. Anything reading several hundred ohms points to a break or damage somewhere in the line.
For a solid red light, try unplugging the power supply from the station for about 30 seconds, then plugging it back in. If the red light stays on, that’s a sign to contact a Husqvarna dealer for repair.
And if the weather’s been rough lately, keep that in mind before you start pulling wires apart. A mower that stops working after a thunderstorm may have surge damage to internal components in the mower or the station, even if the wiring looks completely fine on the surface.
A note on working area and terrain
The 115H is built for smaller yards, and knowing its limits before you finalize placement saves a lot of frustration. It’s rated for lawns up to 0.4 acres and can cover about 720 square feet per hour, running roughly 60 minutes per charge. It can handle a 30 percent slope (about 17 degrees) within the main working area, but a Husqvarna representative clarified on the product’s own Amazon Q&A page that the incline right at the boundary wire itself shouldn’t exceed 15 percent, since steeper grades near the wire can cause traction problems even though the mower handles steeper slopes fine once it’s out in the open lawn. That’s worth factoring in if your ideal charging spot happens to sit at the top or bottom of a slope.
Owners who’ve run the 115H for a while also flag a real world quirk worth knowing before you commit to a spot: the mower runs in reverse, meaning it operates opposite to how most other Automower models are built, which some installers say adds extra challenges on hills near the docking area.
If you’re mapping out where the boundary wire and station will sit, our full guide on setting up a robotic mower’s boundary wire covers the layout planning in more depth, including how to handle islands, narrow passages, and tricky yard shapes.
Getting the extras right
If your outlet is too far from the ideal charging spot, an extension for the low voltage cable is the fix, not moving the station somewhere less than ideal. Husqvarna’s own accessory line and compatible aftermarket options both work here.
Husqvarna Automower 115H Robotic Lawn Mower
Timbera Low Voltage Cable Extension for Automower 115H (3 meter)
The main takeaways
Level ground within 2 cm of tilt matters more than most people realize, and it’s the single easiest thing to check before you blame the wiring. Clearance space in front, on both sides, and behind the station isn’t optional, it’s what lets the mower actually align and dock. The guide wire is the 115H’s lifeline since this model depends on it completely, so keep it properly spaced from obstacles and away from metal objects that could interfere with the signal. And before you assume the station is broken, check the LED color first. It’s telling you exactly what’s wrong, whether that’s a power issue, a wire break, or something that just needs a dealer’s attention.
Get the placement right the first time, and the whole “does it actually dock itself” question stops being a daily worry.
Frequently Asked Questions
How far does the Automower 115H charging station need to be from a power outlet? There’s no fixed maximum distance in Husqvarna’s guidelines, but the station needs to reach a standard outlet using the included low voltage cable, which typically runs between 16 feet and 5 meters depending on your kit. If your outlet is farther away, use a compatible extension cable rather than repositioning the station somewhere less ideal.
Can the Automower 115H charging station sit in direct sunlight? It can, but Husqvarna recommends shade or a protective mower house whenever possible to protect the station’s plastic housing and internal electronics from long term sun and temperature exposure. Direct sunlight alone typically doesn’t damage the unit immediately, but it does shorten its lifespan over time.
Why does my Automower 115H charging station show a flashing yellow light? A flashing yellow light on the 115H specifically means there’s a break somewhere in the guide wire. This model relies entirely on the guide wire to navigate back to its station, so this warning exists only on the 115H among current Automower models.
How level does the ground need to be under the charging station? Husqvarna’s manual specifies a maximum tilt of plus or minus 2 cm. Anything beyond that can throw off the mower’s alignment with the charging contacts and cause repeated failed docking attempts.
What does a solid blue light on the charging station mean? A solid blue light means there’s too much wire used in the boundary loop, which weakens the overall signal. This is different from a flashing blue light, which usually points to low voltage, a board issue, or a wire connection problem.
Can metal objects near the charging station cause problems? Yes. Metal items like rebar, metal landscape edging, or coiled low voltage cable near the station or wires can interfere with the signal. Keep the installation area clear of these where possible.
How much clearance does the Automower 115H charging station need on each side? For a physical boundary wire setup, Husqvarna recommends at least 150 cm (60 inches) of clear space on both the left and right sides of the station’s center, plus 3 meters in front and 60 cm behind it.
Why won’t my Automower 115H dock even though the light is solid green? A solid green light only confirms the boundary wire system is working. It doesn’t check the guide wire, so a green light with a docking failure often points to a guide wire issue specifically, especially on the 115H, which depends on that wire completely to find its way home.
Does the Automower 115H charging station need Wi-Fi? No. The 115H connects through Bluetooth rather than Wi-Fi or cloud connectivity, so there’s no need to place it within Wi-Fi range. Just keep in mind that Bluetooth control has a shorter range, typically around 30 feet.
What should I do if the charging station light is completely off? Check the power supply unit, the low voltage cable, and the mains connection for damage or loose connections first. Also check whether there’s been a power outage or a tripped residual current device at the outlet, since either can cut power to the station without any visible damage.
References:
- Husqvarna Automower Charging Station Placement Guide - us-support.husqvarna.com
- Automower 115H Operator’s Manual - Husqvarna
- Husqvarna Automower LED Light Guide (Flashing Green/Red) - husqvarna.com/uk
- No Loop Signal Troubleshooting Guide - husqvarna.com/uk
- Different Husqvarna Automower Charging Station LED Colors - roboticmowerservices.com
- Husqvarna Automower 115H Product Listing - Amazon.com